Canon has improved things across the board for the new model, but the big news is that the camera arrives with a fresh 26.2MP full-frame sensor. The Canon EOS 6D Mark II features a 26.2 Megapixel full-frame CMOS sensor (approx. 35.9mm x 24.0mm) designed to create high-resolution and detailed images The combination of the sensor and processor allows Canon to add capabilities like 4K timelapse movie and 1080/60p recording. Canon also supplements the Wi-Fi and NFC connectivity with Bluetooth.
IAfter testing many video editing applications with Canon EOS 6D Mark II 1080P footage and 4K time-lapse movies, the result shows that we can't import MPEG-4 AVC / H.264 files into Final Cut Pro X and Premeire Pro CC directly due to the codec incompatibility. Something else, there's actually no way to edit a 4K project in these editing software natively. In this case, to have a smooth Canon EOS 6D Mark II recordings workflow on Mac, you'd better convert MPEG-4 AVC / H.264 to FCP X/Adobe Premiere Pro edit-friendly format with proper settings. It will save you both time and trouble, and all you need is to drag the result videos for prompt editing.
The process is surprisingly easy and can be done with the help of Acrok Video Converter Ultinmate for Mac. The program can effortlessly encode/re-encode 4K MP4, MOV, MXF, etc footage to advanced encoders like Apple ProRes 422, MPEG-2, etc. to seamlessly fit for Final Cut Pro (X, 7, 6), Adobe Premiere Pro (CC, CS6, CS5) and more. For working Canon EOS 6D Mark II videos on Windows PC, you can turn to Acrok Video Converter Ultimate. Just download it and keep reading for a brief how-to on each process.
Free download Canon Video Converter here.
How to convert Canon EOS 6D Mark II 4K files for FCP X?
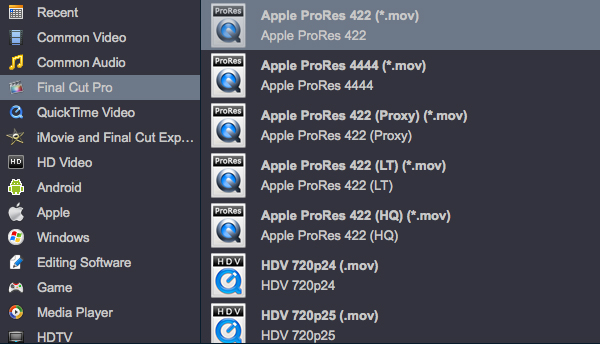
The way to convert Canon EOS 6D Mark II video to MPEG for editing in Premeire Pro is almost the same. You need to choose output format under Editing Software category.
1
Add 6D Mark II videos
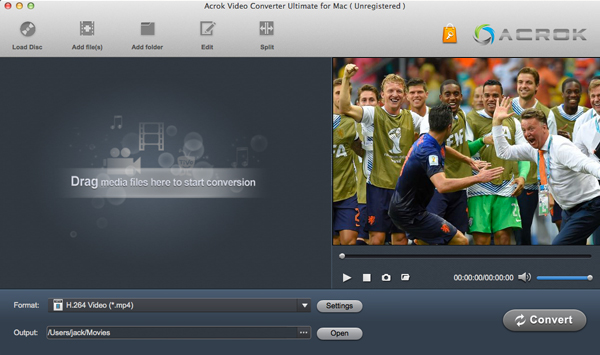
Run the Canon EOS 6D Mark II Video Converter program you just set up. Drag and drop video files to the converter. You can also hit Add files button to import videos to the program. If you wanna combine several videos into one file, you can click "Settings" then check "Merge all files into one" box.

2
Choose output format
For editing your 4K or 1080P footage in Final Cut Pro, click the "Format" bar and select Final Cut Pro> Apple PreRes 422(*.mov) as output format.

Tip" Click "Settings" button if you'd like to customize advanced audio and video parameters like Video Codec, aspect ratio, bit rate, frame rate, Audio codec, sample rate, audio channels. Here we recommend to downsize 4K to 1080p. Note: If you want to get original 4K resolution, just keep the video size as original.
3
Start video conversion
When you finish all settings, hit "Convert" button to start converting Canon EOS 6D Mark II video for FCP X or Premeire Pro on Mac. You can follow the conversion process from the pop-up windows. After the conversion, it's freely to import your 4K MP4 into FCP X and Premiere Pro for natively editing.
 Secured Shopping
 30-day Money Back
 Automatic Updates
 Customer Service


