Q: Having problems importing MXF. file types into my Premiere CC project. I will go to import the folder and the yellow loading bar will come up to say that it's importing. How to deal with this problem?
A: MXF should play perfectly in Premiere Pro CC, but MXF has different video/audio codecs, that depends on what's inside the MXF, which is capable of holding a great variety of audio and video types. Not all of them will work in CS6. For example, support for DNxHD in the MXF format wasn't added until Premiere Pro CC, and won't work in CS6. For loading all MXF files into Premiere Pro, you need to convert MXF to Premeire Pro supported foramts on Mac or Windows.
If you want to import and edit video in Premiere Pro, you need to know what video format can import into Premiere Pro CC, CS6, CS5 on Windows or Mac. Below content will show you the details.
CONTENTS
>> Part 1: Adobe Premiere Pro Supported Formats
>> Part 2: Adobe Premiere Pro CS5 Supported Formats
>> Part 3: Adobe Premiere Pro CS6 Supported Formats
>> Part 4: Adobe Premiere Pro CC Supported Formats
>> Part 5: Convert video for using in Premiere Pro CC/CS6/CS5
Note: Not all files are guaranteed to import and edit in Adobe Premiere Pro.
For importing and editing any video/movie/recordings in Premiere Pro (CC, CS6, CS5) smoothly, you need to convert the unsupported formats to Premiere Pro supported codec and format via third-party software, here Acrok Video Converter Ultimate (Windows Version | Mac Version) is highly recommended.

Tip: For rip and convert Blu-ray/DVD to Premiere Pro editing video format, a relatively simple to use Blu-ray ripping tool on the market. Fitted with advanced technology, Acrok Video Converter Ultimate can decrypt and remove copy protection system contained in the Blu-ray or DVD disc and then convert the movie to something that's suitable for adobe Premiere such as MP4, WMV, AVI, M4V, ASF, H.264 AVC, etc.
Some filename extensions - such as MOV, AVI, MP4, MXF, MKV, and FLV - denote container file formats rather than denoting a specific audio, video, or image data format. Container files can contain data encoded using various compression and encoding schemes. Premiere Pro can import these container files, but the ability to import the data that they contain is dependent on the codecs (specifically, decoders) installed.
By installing additional codecs, you can extend the ability of Premiere Pro to import additional file types. Many codecs installed into the operating system work as a component inside the QuickTime or Video for Windows formats. Contact the manufacturer of your hardware or software for more information about codecs that work with the files that your specific devices or applications create.
How convert the video files to Premiere Pro friendly video formats with Acrok Video Converter Ultimate? Just get the right version according to your computer's operating system and follow the step-by-step guide below to achieve your goal smoothly.
Part 5: Convert video to Premiere Pro best editing format
1
Load source videos
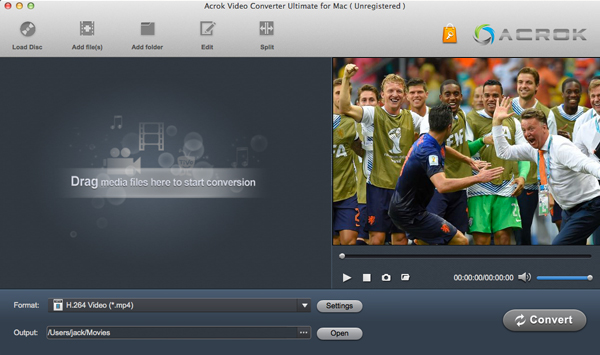
Copy the video files from camera or camcorder to your computer. Launch the any video to Premiere Pro Converter, and you may either click "Add file" button to import video files, or directly drag and drop the files into this program. For ripping and covnerting Blu-ray/DVD for Premiere Pro, please Click "Load disc" icon to load video files.

2
Select output format
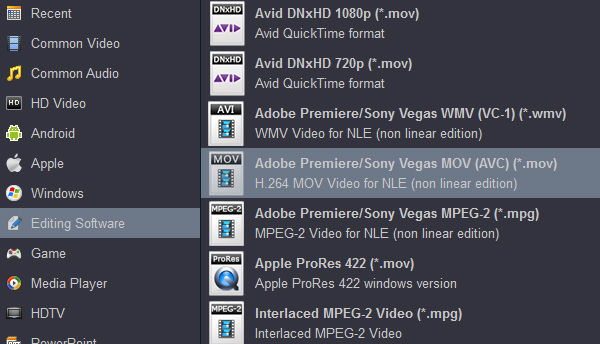
Acrok software is able to output proper formats for video editing software and devices. For editing video in Premiere Pro smoothly, please follow Editing Software tab and select Adobe Premiere MOV AVC(*.mov) or Adobe Premiere MPEG-2 (*.mpg) as output format. Alternative formats are WMV, AVI, DV, etc.

3
Settings
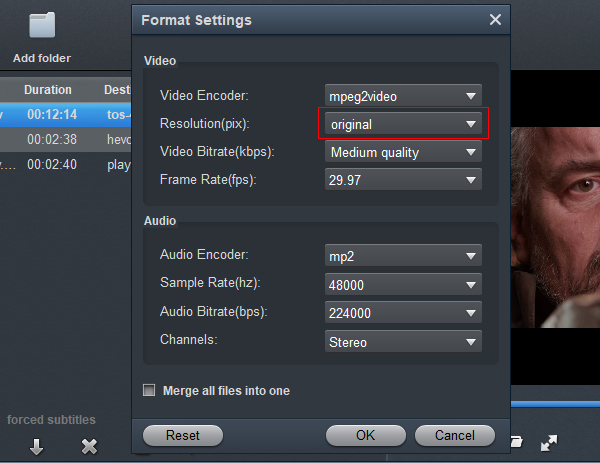
To make good control of the output file size and quality, you can adjust all the items in the following interface, including codec, aspect ratio, bit rate, frame rate, sample rate, and audio channels. To bear least quality loss, you may view the video information in the Preview window (or select the video file and click "Show selected task properties" button to check file info) and set A/V parameters according to the source video file. Note this could lead to huge file size. A way to cut file size down is to set smaller value in Video bit rate box.


4
Start video conversion
Finally, press the convert button; it will start to convert video files to H.264 or MPEG-2 for Premiere Pro CC, CS6, CS5 immediately.
After the conversion completed you can click on "Open" button in the main interface to get the generated files and load the video to Premiere Pro.
5
Import video into Premiere Pro
Start up Premiere Pro, follow File > Import > File"
What's the next? Download and try any video to Premiere Pro supported format conversion software.


