To get Premiere Pro CC working perfectly with BRAW files, the easy workaround is to transcode BRAW to MPEG-2, something ensuring best results when using BRAW in Premiere Pro CC.
After the initial release, it was only a week before transcoding tutorials came out, so users could take their BRAW files from DaVinci Resolve Resolve and edit in Premiere Pro. And, a few months after the release of BRAW, Blackmagic Design released BRAW Studio that allows users to directly import BRAW, with the internal RAW properties fully adjustable, within the effects panel. However it wasn't optimized to use the GPU making it a bit clunky for larger projects.
BRAW not working in Premiere Pro
If you have this BRAW Studio installed on your computer, you may try editing your 8K, 6K, 4K and Full HD BRAW videos in your Premiere Pro CC. You will find that this is a painful process. Can we download a BRAW Video Converter to transcode BRAW to Premiere Pro CC supported video format? The answer is NO. As a film editor, I should give you some pertinent suggestions.
BRAW is the raw video format used by Blackmagic cameras. Videos taped with these cameras produce BRAW files as their native file format. As its own format, Blackmagic Design naturally has a sense of self-protection. It is natural that BRAW is supported by DaVince Resolve 17. Although the company has released plug-ins to facilitate us to import BRAW videos into Premiere Pro, the results are not satisfactory. So I suggest using another method to solve our problems. Although there are some twists and turns, the ideal goal can still be achieved.
Solution: DaVinci restore 17 + Acrok
First, we download and install DaVinci restore 17 from the Blackmagic Design official website. Then render the BRAW to H.264 MP4 format. The second step is to use third-party software to convert the rendered video into Premiere Pro CC's best editing format. Why? I'll give you a detailed explanation below.
Although Adobe claims that Premiere Pro support processing H.264 video clips, you may encounter problems when editing some H.264 footage in Premiere Pro CC, CS6, CS5, etc, especially the H.264 video clips from digital SLRs. In fact, the H.264 compression format is a final delivery codec, it's not an ideal one you want to use for editing. In order to make your editing process simpler and less resource-intensive, you're recommended to transcode H.264 footage to MPEG-2 codec and import it into Premiere Pro. For this purpose, this guide will show you how to easily convert H.264 to Premiere Pro's editing-friendly MPEG-2 codec without quality loss.
Converting H.264 to MPEG-2 for editing in Premiere Pro CC
The quick workaround is to use the easy-to-use yet professional app called Acrok Video Converter Ultimate, which is compatible with Windows 11and lower. Even though most used post-production applications allow H264 to MPEG-2 transcoding using their built-in export features, sometimes the process takes a significant amount of time, or the settings box has numerous confusing options that newbies find hard to understand. Acrok bridges this gap by providing one of the simplest user interfaces, and the pre-configured presets that you can use to transcode H.264 or any other video format to MPEG-2 without any hurdles or complications.
Free download Acrok Video Converter Ultimate
Note: This software cannot directly convert BRAW to Premiere Pro's best editing format. There is no video converter can support BRAW video import and transcoding so far.
This excellent H.264 to Premiere Pro converter can process 8K/6K/4K/HD H.264 video files you shot with GoPro, DJI, iPhone, Android, camcoder or any other cameras. With it, you can effortlessly transcode any H.264 footage to MPEG-2 for using in Premiere Pro CC and it works well and converts flawlessly. This program also comes a Mac version which allows you to convert H.264 MP4 videos to MPEG-2 on Mac (macOS 12 Monterey included).
1
Import rendered files
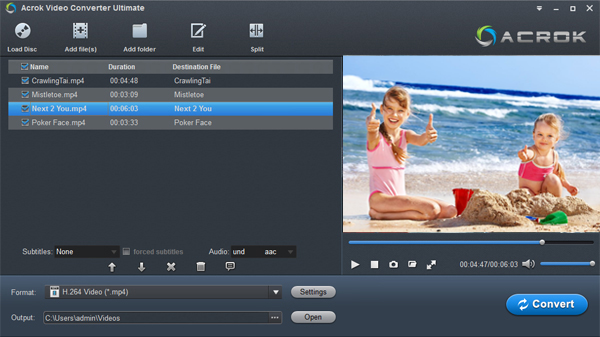
Download and launch Acrok Video Converter Ultimate. Click Add File button to import your rendered MP4 video. Dragging and droppping works too.

2
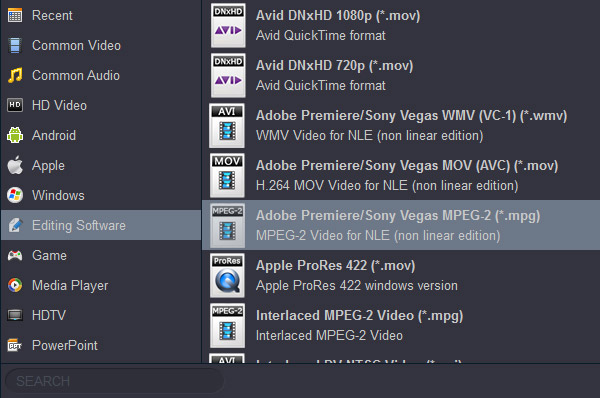
Choose MPEG-2 as the output format
Click Format bar and move mouse cursor to Editing Software category and you will see many options to convert your rendered video for certain video editing software. Since you will be importing the video to Premiere Pro CC after the conversion, have MPEG-2 MPG be your selected output format.

2
Start the conversion
At this point, you can change the output filename or output path if you wish. If you feel satisfied with your options, Just hit the Convert button to activate H.264 file to Premiere Pro CC MPEG-2 conversion.
After the conversion, click Open button to locate the result videos and then you can start fun away with editing BRAW files in Premiere Pro CC without crashing problem and avoid rendering.
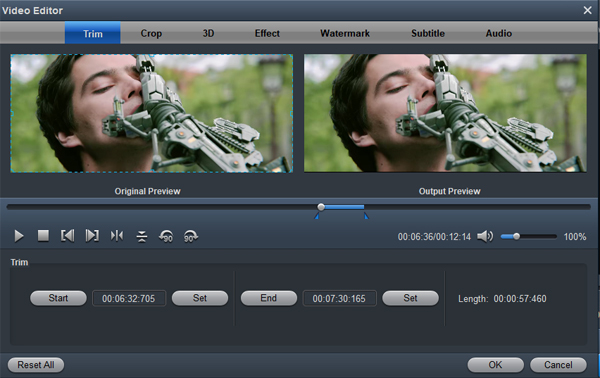
Tip: Before the video conversion, you can edit the videos as your needs. Click "Edit", you can trim, crop the rendered BRAW video on macOS 12 and Windows 11. For getting 3D videos, this software can add 3D effect onto e loaded videos.


