Want to get a free video editing software with powerful editing functions? Blackmagic Design DaVinci Resolve 19 is your best choice. It offers a variety of tools for professional video editing and color grading along with a built-in visual effects toolset and robust audio editor. It's got a remarkable price of free, with the option to upgrade to DaVinci Resolve 18 Studio for $299 to unlock the full toolset. The Studio includes everything found in the free version plus multi user collaboration features that let editors, colorists, effects artists and sound engineers all work together on the same project at the same time, plus 3D tools, dozens of Resolve FX and more.
If you aer Blackmagic Design camera user, you can import and edit the recorded footage in DaVinci Resolve. Thanks to its sleek and streamlined interface, unmatched ecosystem of tools and the new added features such as Multiple timelines/tabs,
Searchable sound library in Resolve,
Recording ADR into Resolve,
Noise Reduction on audio and so on. Its incredibly wide format support makes it compatible with virtually every modern file format and media type in the world, including Blackmagic RAW, making it the ideal hub for your post production workflow!
"Hi, Admin. I recorded some .mxf (H.265/HEVC) videos by Canon XF705. But DaVinci Resolve can't red the videos. Dose software supports MXF importing? I can load the MPEG-4 AVC/H.264 footage into DaVinci Resolve, but I can't edit it smoothly. Maybe my computer hardware is not up to standard. How to solve this problem? - Daniel Aviles"
From Blackmagic Design official website, we can see that the DaVinci Resolve supports the .mxf format import and edit. But it only supports ProRes, DNxHD, XAVC Intra, MPEG4, DNxHR and XDCAM HD LP, codec videos. As for older software, fewer codes are supported. When you try to open a .mxf on DaVinci Resolve, you probably get a message "Error trying to open source media file", or something like that on the screen. In order to share your wonderful videos better, you need to solve the compatibility problem of editing software first.
How to import and edit all the Canon, Sony, Panasonic, JVC, RED, Ikegami MXF footage in DaVinci Resolve 19, 18, 17, 16 smoothly? In order to edit any MXF video with DaVinci Resolve, it's required to first convert the MXF to Davinci Resolve native compatible DNxHD or ProRes codec using 3rd party video conversion tool. If you want a tool which converts your video files to the proper format with a simple front-end or get plenty of control over audio and visual settings, Acrok Video Converter Ultimate (Windows | Mac) deserves a try.
Free download Ultimate MXF to DaVinci Resolve Converter
Convert MXF to DNxHD or ProRes codec via Acrok software
1
Open up the program and add MXF videos
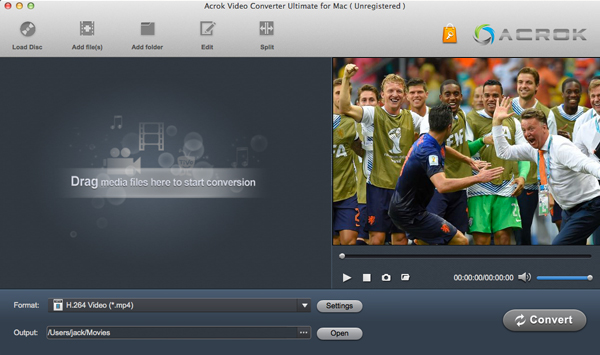
To get things started, we need import MXF files in the program. You can do this in two different ways. The first and easiest method is to simply open the local folder containing .mxf files, drag them and drop onto the any format to DaVinci Resolve supported formats converter. The other way is to use the "Add File" option at the toolbar of the program, in opening dialog box, locate the MXF videos you wish to convert. Batch conversion is supported, here you can add a slew of .mxf videos simultaneously.

2
Select output format
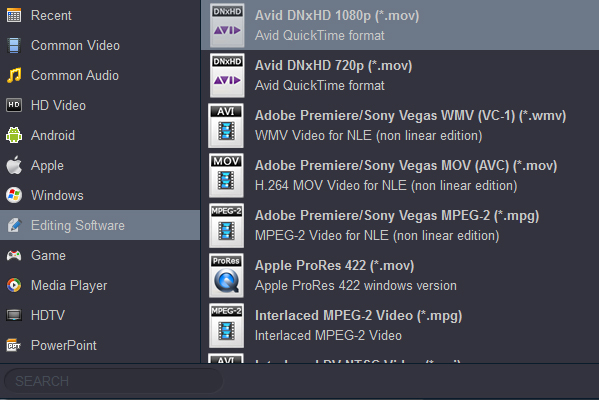
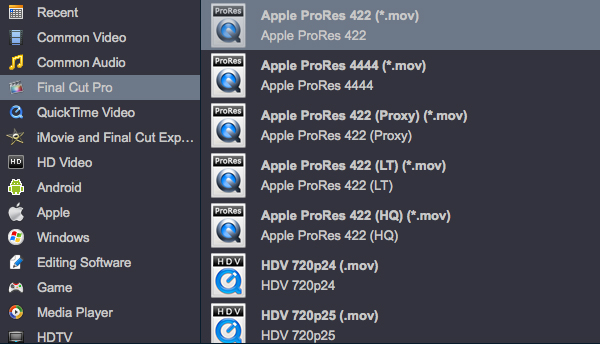
Once you've MXF imported, click "Format" drop down menu at the bottom of the MXT to DaVinci Resolve Converter interface. This will bring up the format selection dialog. You then select "Avid DNxHD 1080P (*.mov)" there under "Editing Software" category, "Apple ProRes 422 (*.mov)" there under "Final Cut Pro" column as shown below.
DNxHD Video >>

ProRes Video >>

3
Settings
For advanced user, you can click "Setting" beside "Format" menu and spend a few minutes configuring the parameters like Bitrate, Sample Rate, resolution and other things. If you don't want to be bothered by that, just leave them alone. After you have configured the output settings, back to the main interface and click the "Output" button at the bottom center to specify a local folder where the output videos will be saved.
4
Start video conversion
Finally, all left to do is click the big blue "Convert" button located at the lower right side of the screen. This way, your MXF videos will be converted to MOV with DNxHD or ProRes codec.
After the conversion process has completed, navigate to the folder you specify previously, they're right on the drive themselves. Done! Now you can create a new DaVinci Resolve 19 project and import your MOV files. Happy video editing!


