Does Adobe Premiere Pro support ProRes RAW? Why you can't import ProRes files to Premiere Pro or video import slow? How to play my 4K ProRes 222 files in Premiere Pro smoothly? Read on to find the reasons and a 100% working solution to fix such issues.
Why can't we load ProRes files to Premiere Pro CC freely?
Premiere Pro is a democratic tool for all skill levels when it comes to video editing. It provides easy to use features and tools to help you to get started quickly and easily. It is by far the best video editing program out there if you are recording something that will be consumed by thousands of people. We can load many downloaded and recorded video formats into Premiere Pro for editing, including Apple ProRes, ProRes HDR and ProRes RAW. But the weird thing is that, sometimes you will find it a painful experience for Premiere Pro to import ProRes files created by Nikon Z9, Blackmagic 6K Pro, DJI Zenmuse X7, Blackmagic 6K G2, iPhone 16 Pro Max, Sony FX3 and more. Most of the time, you can only add the Apple ProRes file the timeline of Premiere Pro. As for Sony, Nikon, DJI and Blackmagic's ProRes/ProRes RAW files, just sound, no video. Wait a second! Officially, ProRes is covered in the list of Premiere Pro supported formats. Why would this still happen?
"Now with my new fresh install of Premiere Pro CC (22.5 and earlier was the versions I had no problem importing and editing these same ProRes files previously), these same ProRes files import as audio only and I cannot seem to find how to have both audio and video to import."
"when I try to import a file into Premiere Pro it says the error could not be determined, it is a ProRes RAW file if that matter"
"I recently updated to Premiere Pro CC 2022, and every time I import a ProRes 422 video file I only get the audio track of that file. I can open the file outside of Premiere Pro with VLC just fine, and it plays both audio and video. The imported file says that there is no framerate, and that the file is audio only."
Mostly, codec incompatibility is to blame. This probably causes Premiere Pro not opening ProRes error or Premiere Pro freezing after ProRes importing if your computer hardware configurations lack enough power to handle the stress brought by compute-intensive ProRes 422 and ProRes RAW.
ProRes and Premiere Pro incompatibility solution
Facing problems importing ProRes file to Premiere Pro? Follow this article to find out the reason and an easy solution to fix ProRes 422 and ProRes RAW file import failure in Premiere Pro CC, CS6 and CS5.
In this article, we'll show you how you can create a video conversion process from your ProRes 422 and ProRes RAW footage, into a more edit-friendly format. The end result, you can import the your stuff into Premiere Pro without any problems.
Acrok Video Converter Ultimate is what we're going to use in this article. As its name clearly says, this is an tool whose main feature is its seamless ability to convert your digital video files to more common file types that are suitable for your desktop media players, portable devices, editing applications (i.e. Adobe Premiere Pro), TVs, online sites and more. Aside from the basic video comversion feature, it can also directly take and extract audio/sound tracks from any given video or movie or convert them into any other common-used audio format in hand. Plus, this utility allows you to modify codec, aspect ratio, bitrate, resolution among other things to have a better control over the output quality as well as to trim, crop, and layer video effects for a more hands-on approach. Download ProRes to Premiere Pro Converter to help you seamlessly do the ProRes 422/ProRes RAW to best editing format conversion task for Premiere Pro CC/CS6/CS5.
If you're mainly working on a Mac and want to get ProRes recordings into Premiere Pro for editing on your another PC machine, please try Acrok Video Converter Ultimate for Mac.
Free download and try ProRes to Premiere Pro Converter here
ProRes to Premiere Pro Converter Features
- Convert to ProRes 422 and ProRes RAW to Premiere Pro CC/CS6/CS5 native editing format
- Convert 2D recordings/videos to 3D MP4, MKV, MOV
- Convert ProRes video to H.265, H.264, MPEG-2, DNxHD, AIC
- Trim, merge, crop ProRes 422/ProRes RAW video
- Encode MKV, MOV, MP4, MXF, MTS, WMV, AVI to ProRes codec
- Add .srt and .ass subtitles into any videos
- Rip and convert Blu-ray/DVD files to ProRes codec
- Convert Blu-ray, DVD and downloaded movies to any format and any device
How to Convert ProRes to Premiere Pro Edit-friendly codec/format?
To begin with, you need to download and install Arok Video Converter Ultimate Windows or Mac version on your computer. The guide below takes the Windows version for an example. Mac version has the same process.
1
Add Video
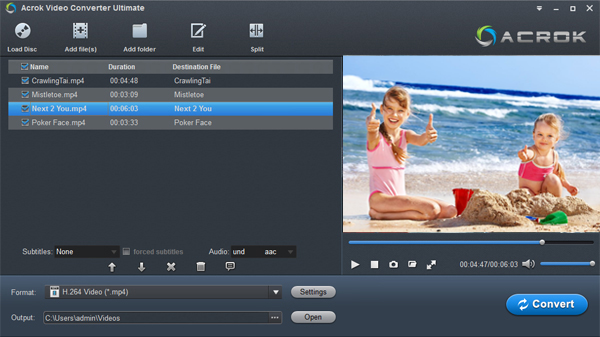
Run Acrok Video Converter Ultimate as the best ProRes Video Converter on PC. Click "Add files" icon to load your sources ProRes 422 and ProRes RAW videos. Or find and selected the video files you want to convert, then drag and drop them to the software interface.
2
Choose Output Format
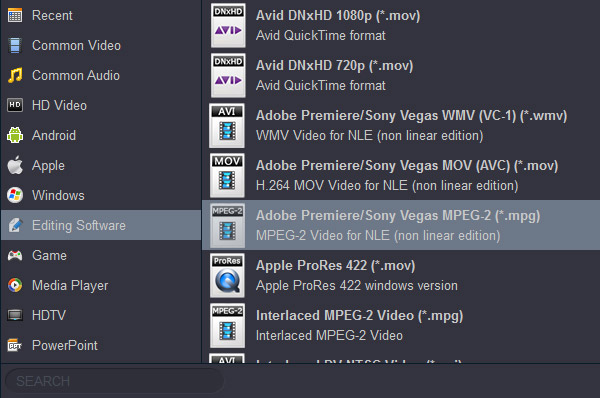
Next, you should select an output format so all your imported videos will be converted to what you need. This ProRes to Premiere Pro Converter comes with presets for main video editors for PC, such as Premiere Pro, Avid Media Composer, DaVinci Resolve, Vegas Pro, etc.
For converting ProRes files to Premiere Pro best editing format, you can click "Format" to select Editing Software" then "Adobe Premiere MOV (AVC) (*.mov)" or "Adobe Premiere MPEG-2 (*mpg)".
3
Edit And Settings
Edit ProRes video
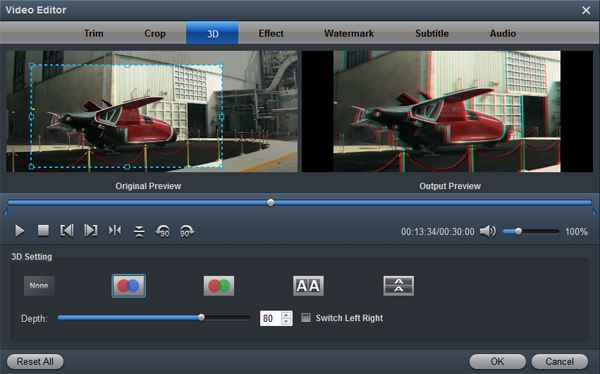
Select a video, you can click the "Edit" icon on the tool bar of the ProRes video converter interface to edit selected file. On the "Video Editor" Window, you can play and preview the original video and output effects. Also you can trim video, crop, add 3D effect, add watermark, add subtitle, and adjust volume.
Settings:
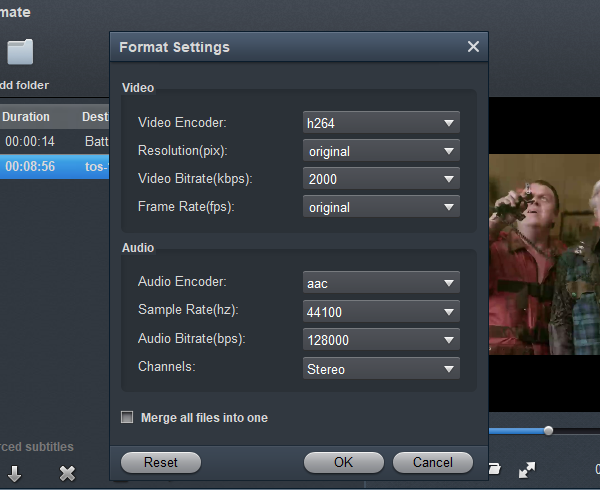
For getting output videos better , you can click "Settings" button to adjust the resolution, bitrate, frame rate, etc. If the loaded video is 1080P footage, you can choose "1920*1080" as output video resolution. For getting orginal video resolution, please select "Orginal" in "Resolution (pix)" column.
4
Start Video Conversion
Click "Output" bar to choose an output folder if necessary. Then, tap "Convert" button to start transcoding ProRes 422 and ProRes RAW files. When the conversion completes, you can load the output file into Premiere Pro CC, CS6, CS5 for a smooth editing without any trouble.


